Friday, May 27, 2011

Feature: Flower Hair Pin Tutorial

Today's Feature comes from a good friend of mine, Kat. Kat has her very own blog at Pins and Needles! Please stop by and check it out!!


Flower Hair Pin Tutorial


MATERIALS:

* 17ish inch strip of fabric (1-2 inches wide)
* 1 inch circle of felt
* Hair pin
* Button or bead for center of flower
* Glue

STEP 1:
Cut your fabric strip. It can be any fabric you prefer but should be thin enough to gather. Here I used a raw silk. The strip can be approximately 17-20 inches long, depending on how many layers of petals you want your flower to have. Leave the edges raw.


STEP 2:
Sew a basting stitch down one edge of the fabric strip.


STEP 3:
Pull one end of the thread to begin gathering the fabric. Once it is gathered to your liking, tie of the ends.


STEP 4:
Coil the fabric to create layers of petals. The gathered fabric will naturally want to do this.


STEP 5:
It's time to assemble the flower. Choose a button or bead for the center of your flower. Next, glue each end of the strip where you want them to secure the petals.


STEP 6:
Glue the felt circle to the back of the flower and the button on the center front.


STEP 7:
Glue the hair pin to the felt on the back of the flower...


...and TADA!

Wednesday, May 25, 2011

Feature: Kitty Cats & Airplanes

Hellos all Cait's readers! I'm so excited to be here today to fill in while Cait is off exploring the world!. I'm Amie, and I have my own little corner of the internet called Kitty Cats and Airplanes.


When I graduated college I suddenly found free time on my hands, so I rekindled my life long love for arts and crafts. Too bad since then I've gotten a job! Luckily the hubs is ok with my addiction. :)

Whilst visiting KC&A, you can expect to a lot of craziness, I've got serious crafting ADD! I'm always trying something new.

Upcyled Sewing projects (men's shirt to a ruffly top for me!)

From scratch sewing projects (elastic lace skirt)

Home decor (button frame)

Grown up accessories (lace bow)

Jewelry making (Button bracelet)

 And recently I've been into felt! (glue gun wallet)

I post tutorials every Tuesday, recipes every Friday, and a ton of other fun crafty things. I hope to see you over at Kitty Cats and Airplanes soon! Thanks Cait!

Monday, May 23, 2011

Feature: Liz Marie Blog

We landed in London yesterday! No tours planned for here, just a lot of walking and site seeing for us! I think I am the most excited to see the London eye...I hear it is amazing!
------------------------------------------------------------------
Today Liz from Liz Marie Blog is sharing some of FABULOUS redo's with you all! I came across Liz's blog a while back and have been a dedicated follower ever since. I love her style and ability to take something drab and turn it into fab! In fact, one of her more recent posts--Makeup Storage, is on my to-do list for when I return from my trip!! Enjoy! 


Hey Everyone!!! I am Liz from Liz Marie Blog. My blog is full of DIY projects which I hope inspire my readers to try. Also, like Caitlin, I love re-doing old furniture & giving it new life. I am really excited to be a guest blogger here at  Caits Creates!! How cute is she & how jealous are you that she's in Europe right now!!? Lucky girl, I can't wait to see pictures. Anyways, I wanted to share with you a few of my latest & greatest projects with you guys...
Here is a night stand that I got for free & refurbished check it out HERE.


This is a lampshade I made of coffee filters!! Yes, a $2.00 makeover!! Check this DIY project out HERE.

I got this chair from GoodWill for $3.00. Check out the before & after pictures on my blog HERE.

& last, but not least, is these cute painted mason jars. Very simple & don't forget, CHEAP! Check out this DIY project HERE.


I hope you all enjoyed seeing some of my latest DIY projects. Be sure to head on over to Liz Marie Blog & leave me a comment so I can meet all of you!! I would also love to know if you try any of these DIY projects, come link them up at Liz Marie Blog Facebook Page. & a big thank you to Caitlin for asking me to do a guest post!! xx Liz Marie

Friday, May 20, 2011

Feature: The Crafty Scientist

We landed in Oslo, Norway. The main reason for coming to Norway was so I could visit a friend of mine. We don't have set plans for Oslo like the rest of the trip--we're secretly hoping Oystein will act as our tour guide :). We are only here for the weekend, but will have plenty of day light to fit a lot of sight seeing in. Right now Oslo is experiencing about 19 hours of daylight per day, which is how Norway got the name "Land of the Midnight Sun". Who knew?

---------------------------------------------------------------------
Today Mel from The Crafty Scientist is sharing some of her unique tutorials with you all. I enjoy reading Mel's blog because like me, she too is a graduate student--which means finals make us lose our mind--but blogging keeps us sane. It's a nice balance :) Even though Mel is a student with a tight budget, she still manages to come up with some of the coolest projects. I personally think being frugal forces us to be more creative and as you'll see below, Mel confirms that belief with all of her awesome tutorials. Enjoy! 

I'm so thrilled to be here and a HUGE thanks to Miss Caitlin for having me - especially because I was crazy-disorganized and she had to coach me through it!

I started my blog - The Crafty Scientist - in January of this year so I'm still pretty new to blogging. Basically, I used to write fun, fancy (frugal!) letters to my best friend while she was serving the U.S. Army in Afghanistan. I figured out ways to make fun stationery and started reading blogs to get mailing labels and cool printables and then when my friend returned stateside, I wanted to do more creative things... so my blog is where I share some things I do in between teaching my own giant lecture course (and I do my own grading - insert "oooo's" and "ahhhh's" here), finishing up my Ph.D., consulting jobs, spoiling my dog (and the boyfriend's dog) rotten, using my new DSLR camera and trying to learn a bit about photography, and a million other things...

the little furry loves of my life
So far, even though my blog is pretty new, I've explored blog design and made my own buttons, background, header, post divider... the whole nine yards! I've provided some links and told everyone what I learned in this post. I don't have a ton of money to spend on crafts and I don't have fancy tools so most of my projects are pretty easy to do and don't require expertise. I've also tried to incorporate some of my most favorite things into my projects. And some of my other loves include argyle, candy and sweets, monograms, jewelry, and paint chips - so some of my favorite projects obviously includes them!

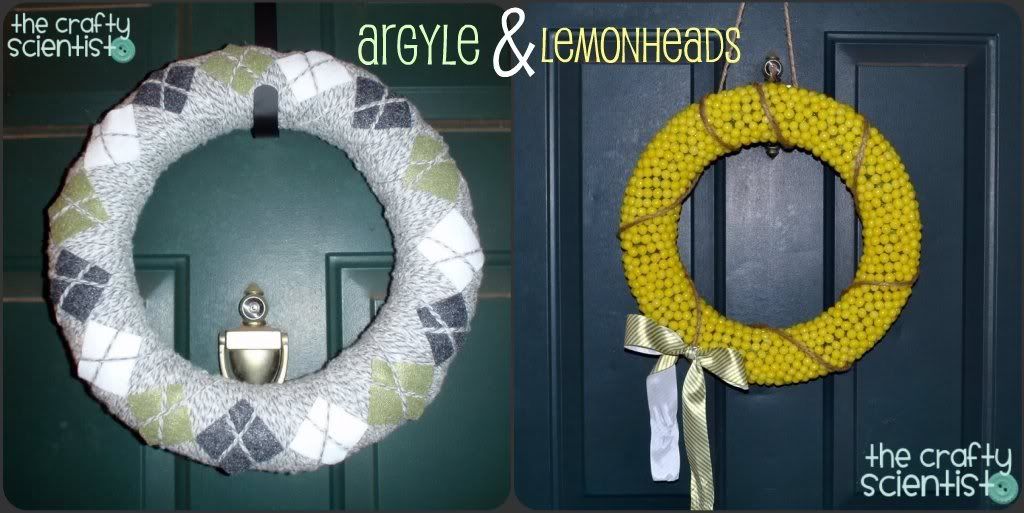
First, there's this argyle wreath I made (and you can find the tutorial here). I really like my wreaths and so I decided to name them after constellations in keeping with the science theme. This was one of my favorites though - it was surprisingly easy once I figured out it was basically yarn, straight pins, and felt! Then came the lemonhead wreath, hung up with some jute!

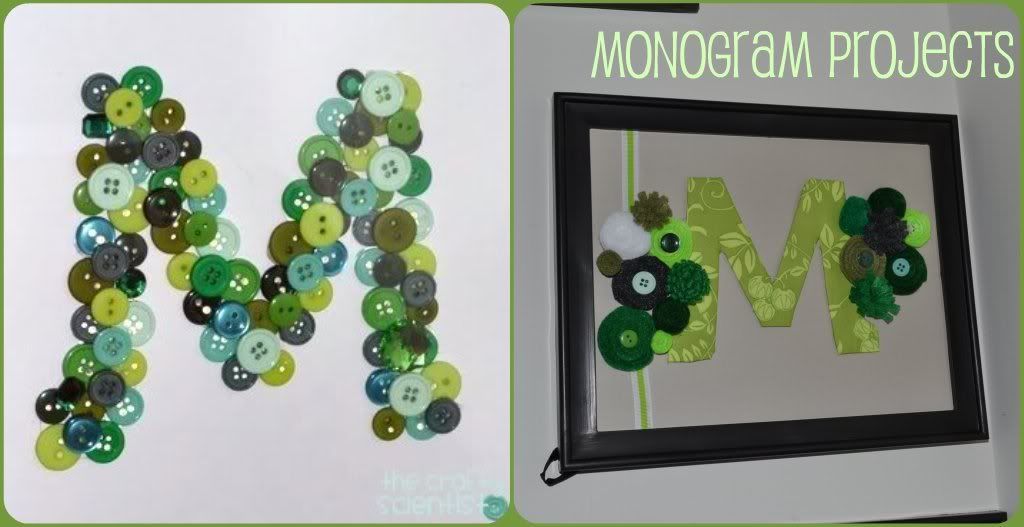
My love of monograms and initials has led me to create two fun little monogram projects - and I definitely have more in the works - one with buttons and the other with felt and fabric I had on hand!

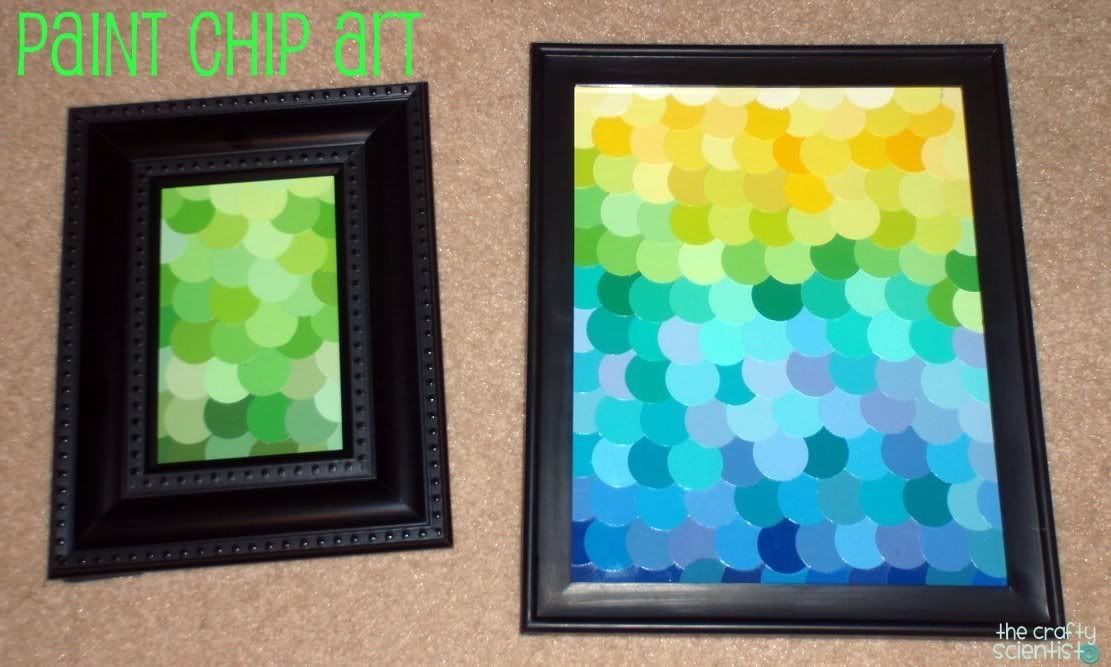
Recently, I shared how I made these works of art from paint chips and mod podge. And how I've made tons of them since then because I love to collect paint chips... and ideas for more paint chip projects (you can find my Pinterest pinboard here to see them all).

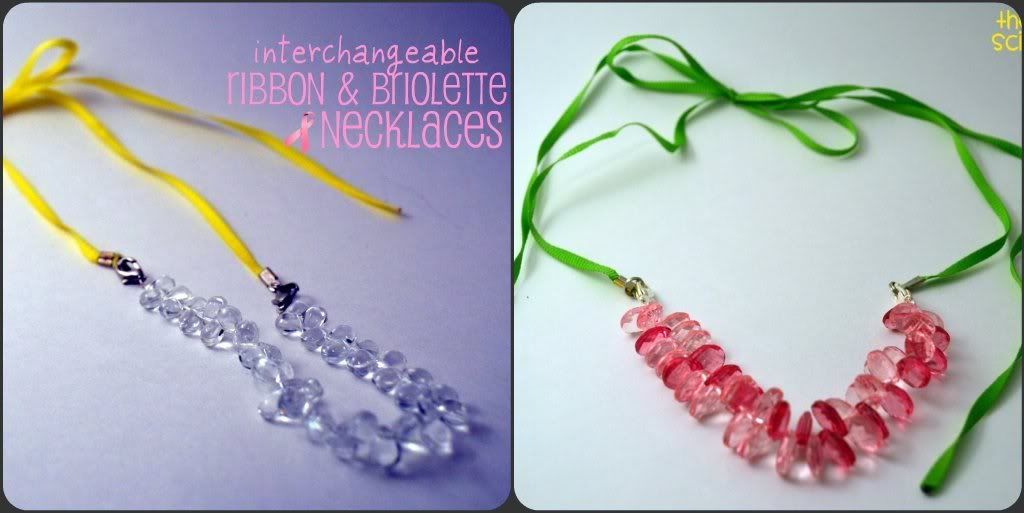
And of course, there's my love of jewelry... when one of my students told me she loved looking at the interesting necklaces I wore every day, I determined I had to keep it going and create even more to wear! Inspired by Beckie at Infarrantly Creative, I made these briolette necklaces where you can change out the ribbon to match your outfit! I love it!

I hope you enjoyed my little trip down memory lane. A big thanks to Caitlin for letting me share my projects with all of you and I hope you'll visit me at The Crafty Scientist and see more of what I'm creating!

Wednesday, May 18, 2011

Feature: T-Shirt Redo from Dresden Carrie


Still enjoying Ireland...One more day then on to Norway!
-------------------------------------------------------------------------
Today Dresden is guest posting from Dresden Carrie. I recently learned about Dresden's blog and before I knew it I had looked at every single post! It's then that I decided I should try my absolute hardest to get her to do a tutorial for you all. TADA! Enjoy :) 


Hello everyone! What a pleasure to be here sharing a tutorial today. My name is Dresden and you can find me at dresdencarrie. I hope you'll check out my blog sometime soon.
I have a quick tutorial for you today that I used the Silhouette for. If you don't have a Silhouette you can easily do this by hand...or buy a Silhouette!!

What you need:
t-shirt (I used a $3.50 one from Forever21)
scraps of fabric
fabric interfacing (a must when using the Silhouette and highly recommended but not necessary if you are doing this by hand)
sewing machine
coordinating thread

Step 1: iron your scraps of fabric and iron the interfacing to the back (following instructions on pkg)

Step 2: cut out your houndstooth pieces, I did mine about 2.5" x 2.5"
Step 3: lay our your pieces on your shirt, I did mine kindof scattered to add interest.
Step 4: iron the pieces down, this is the best part of the Silhouette Fabric Interfacing. It's double sided so you can iron it down and it will stick down.
Step 5: sew each piece on, I forgot to get a picture, but it's pretty easy. Just be sure to only sew through one side of the shirt! And be gentle with the t-shirt since it's a knit fabric you will have to be more cautious when sewing on it.

Step 6: You're done! I washed mine after this step to make the edges of the pieces a little distressed.
This project only cost me $3.50, I already had scraps of fabric from other projects and I had the fabric interfacing from this project. It's fun to come up with your own t-shirt designs, I look at shirts in the mall and all over the internet to get ideas...then I make them for a lot less $$! I hope this inspires you to do the same.
Thanks for having me! I hope you all come by and say hi sometime soon!

Monday, May 16, 2011

Feature: Jewelry Organizer from Born-Again Crafter

As most of you know, I am in Europe right now. In fact, today I am taking a tour to the Cliffs of Moher (MO-her) in Ireland--this has always been a dream of mine. If you don't know what it is, you should definitely read about it HERE or take a virtual tour HERE. Apparently, it might be part of the 7 wonders VERY soon :) 
-------------------------------------------------------------------------
Today Lyssa is guest posting and I just know you are going to love her! One of the best things about Lyssa is her ability to take something so old and worn--that most people throw out-- and turn it into something cute and unique. And that's exactly what she's done with her awesome, yet fairly simple and cheap upcycle project below! Enjoy! 

I'm so excited to be here with Caitlin over here at Caits Creates!!  Thank you girl!

 I live over at born-again crafter!  My blog consists of a bit of thrifty goodness, sewing, scrapping and lots of redos.  Love redos.  And you can't have too many tutorials either!
I also host a weekly "thrifty thursdays" & "scrapbook sundays" party so I would love for you to join me!  

I also just opened up a etsy shop called Pretty Grey Bench.  Come check it out ;)

Are you curious about my name?  Well, it came from after having my 3rd child, when no time was left for ME.  So I am finding my crafty self again!

Today I'll be showing you how to make this:
Jewelry Organizer!


I desperately needed something done with my jewelry. I was sick of having them in boxes and getting tangled up.
Then I saw this DIY jewelry organizer.
I was amazed and determined to make that. So I hit all the thrift stores in search of a wooden silverware holder, thinking I would easily find one!
Well no, to my dismay, nothing!
But in my wanderings, I found this:

It got me thinking...I could definitely use this for my organizer!

So first step was taking out the shelving.
They were loose so I secured them with some wood glue.

After they dried, I used my mini jigsaw and cut the shelves to the sizes I want. I turned the whole thing vertical.
Then I painted both pieces white...or my husband did..since i'm 8+ months pregnant :)


Then I measured the spaces for the next steps of modge podging paper on the back.


Nice ;)

Then I had to put back the shelving.


Then I used my drill and make holes and added in cabinent knobs to hold the necklaces

Then I glued a piece of dowel on the back so it would be angled a bit so no piece of jewelry would fall off.

And here you go! Atop of the necklace organizer is my earring organizer.
I had an empty frame and hot glued a large piece of lace that I found from this really cool store...the lace was like 25 cents a yard!
Anyways, lace or even tulle work great to hold earrings!


This has been so nice! The smaller cubbies, I use for rings or stud earrings or bracelets!
It is a great addition to my room :)

Hope this inspires you and helps you get a little organized!
Thanks again Caitlin for letting me play over here today!