As most of you know, I am in Europe right now. In fact, today I am taking a tour to the Cliffs of Moher (MO-her) in Ireland--this has always been a dream of mine. If you don't know what it is, you should definitely read about it HERE or take a virtual tour HERE. Apparently, it might be part of the 7 wonders VERY soon :)
-------------------------------------------------------------------------
Today Lyssa is guest posting and I just know you are going to love her! One of the best things about Lyssa is her ability to take something so old and worn--that most people throw out-- and turn it into something cute and unique. And that's exactly what she's done with her awesome, yet fairly simple and cheap upcycle project below! Enjoy!

I'm so excited to be here with Caitlin over here at Caits Creates!! Thank you girl!
I live over at born-again crafter! My blog consists of a bit of thrifty goodness, sewing, scrapping and lots of redos. Love redos. And you can't have too many tutorials either!
I also host a weekly "thrifty thursdays" & "scrapbook sundays" party so I would love for you to join me!
I also just opened up a etsy shop called Pretty Grey Bench. Come check it out ;)
Are you curious about my name? Well, it came from after having my 3rd child, when no time was left for ME. So I am finding my crafty self again!
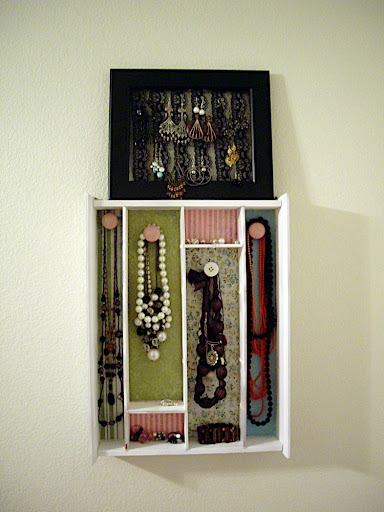
Today I'll be showing you how to make this:
Jewelry Organizer!
I desperately needed something done with my jewelry. I was sick of having them in boxes and getting tangled up.
Then I saw this DIY jewelry organizer.
I was amazed and determined to make that. So I hit all the thrift stores in search of a wooden silverware holder, thinking I would easily find one!
Well no, to my dismay, nothing!
But in my wanderings, I found this:

It got me thinking...I could definitely use this for my organizer!
So first step was taking out the shelving.

They were loose so I secured them with some wood glue.

After they dried, I used my mini jigsaw and cut the shelves to the sizes I want. I turned the whole thing vertical.
Then I painted both pieces white...or my husband did..since i'm 8+ months pregnant :)

Then I measured the spaces for the next steps of modge podging paper on the back.


Nice ;)

Then I had to put back the shelving.

Then I used my drill and make holes and added in cabinent knobs to hold the necklaces

Then I glued a piece of dowel on the back so it would be angled a bit so no piece of jewelry would fall off.

And here you go! Atop of the necklace organizer is my earring organizer.
I had an empty frame and hot glued a large piece of lace that I found from this really cool store...the lace was like 25 cents a yard!
Anyways, lace or even tulle work great to hold earrings!


This has been so nice! The smaller cubbies, I use for rings or stud earrings or bracelets!
It is a great addition to my room :)
Hope this inspires you and helps you get a little organized!
Thanks again Caitlin for letting me play over here today!
Hope this inspires you and helps you get a little organized!
Thanks again Caitlin for letting me play over here today!
I love this post! Thanks, Lyssa for sharing it with us! I am going to go over and check out your blog! Cheers!
ReplyDeleteSherry at Girls Day Out
gdo-family.blogspot.com