It's a {Feature Friday} here at CaitsCreates
This week I am featuring the talented Emma from Ruby Murray's Musings.
Every time I visit Ruby Murray I am inspired and amazed by all of Emma's clothing transformations. Please stop by Emma's blog and check out all the other awesome things she has done with hand-me-downs.
Now, here is Emma...
I'm so excited to be featured by the lovely Caitlin, I always check out her great transformations and today I'll be sharing a refashion of my own.
If you've ever checked out my blog you'll know I love to change things up, my Hand-Me-Down Horror series has been all about buying yucky or just plain boring clothes and making them into something I'd be proud to wear. Hack off those sleeves, raise that hemline and bob's your uncle a cute custom piece, for pittence.
So without further ado get your sewing needles and thread out and sharpen up those scissors!
Before, a plain long sleeve Tee from Old Navy, that cost me a wopping $2.60
1. Hack off those sleeves, keeping the cut line as neat as possible, then turn the sleeves inside out.
2. Next cut off the cuff again nice and straight, then cut off the stitching (serged seam) keep this as straight and neat as possible and keep everything.
This is what you'll end up with, don't throw anything out, nothing goes to waste on this project.
Next you'll be making the bows, out of the sleeves (I know, genius right!)
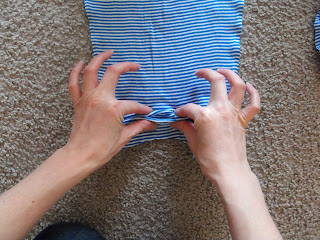
3. Start at the bottom cuff end of the sleeve and slowly pinch your way up, it's a very informal pleat, just basically grabbing finger fulls of the sleeve all the way up until you get to the top and have the entire sleeve pinched between index finger and thumb.
Whole sleeve pinched together
4. Next take the cut off sleeve cuff and wrap it around the middle of the bunched up sleeve, I fanned the sleeve out a little so you can see what it's starting to look like.
5. Keep wrapping the cuff edge around until it's tight and the sleeve is unlikely to fall out.
6. You've just made yourself a cute bow out of a sleeve, now to repeat the process until you have two.
There's a distinct (to me anyway) top and bottom to the bows, the top of the bow will be the rounded edge of the sleeve cap (the top part) just keep this in mind when you come to sew them on.
7. Next we're finishing off the neckline, and for this we're using the two long pieces you have left over from the sleeves, I only kept one so I just sewed the serged piece to the front and it looked fine but if you want to have matching front and back to the tee just continue sewing around the neck.
8. I just used a simple in and out 'running stitch' for the neckline, making sure to line up the serged piece with the neckline edge to make sure it's even.
The finished neck edge, it looks great doesn't it and to think it's just a piece of t-shirt scrap!
9. Next take the bow and making sure the top shorter edge is facing the neck edge line the middle of the bow up with the shoulder seam and simply stitch through the centre of the bow all the way through the t-shirt, I went all the way around the centre piece to make sure it was secure.
That's it, if you want to be extra fancy you could add a few stitches to the bow edges to keep it from flapping around but I've found I didn't need to do this and the bows stayed put. I also left the sleeve edge unturned, you could always turn it under and stitch, personally I liked the raw edge.
So there you are, it shouldn't take longer than an hour even for newbies to sew so even us naptime crafters can make a cute new addition to our wardrobes.
http://rubymurraysmusings.blogspot.com/
I hope you enjoyed this awesome t-shirt tutorial {I can't wait to try it!}. A big thank you to Emma at Ruby Murray's Musing for sharing!
Have a wonderful weekend :)


