My brother and his fiance are getting married July 9th, 2011
and they are HUGE Red Sox fans
I don't have a lot of money to spend on a gift (big surprise) so I decided to make something personal for them. After all, I think personal/ homemade gifts sometimes mean more than the ones you buy off the couples registry!
I decided to make a Red Sox garter for her to wear at the wedding :) This is a complete surprise and the ONLY reason I am posting this now is because I told her she was banned from reading my blog until after the shower on May 7th...or else she would ruin her surprise! So that means for those of you who know Amanda, please dont say anything! :)
Now, let me show you just how I performed this transformation!
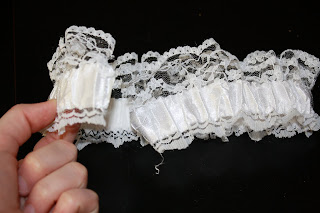
I had planned on starting from scratch but then found this garter at Dollar Tree over the weekend while I was looking for items for the bridal shower...you can't beat 50 cents!
I begun by tearing the seam apart in the back...
Then I removed the elastic to make the material lay flat
Here is what you should have
I then cut 3/4 yard of blue and red ribbon. I threaded my sewing machine with red thread and sewed the red ribbon on top of the blue.
Try to pull the ribbon on both ends as you are pushing it through the machine so you get minimal bunching
Next, I sewed the ribbon on top of the garter. I used coordinating navy thread and went down both sides of the ribbon. It is VERY important to make sure you pull the garter as you go through the machine. If not the ribbon will not lay flat on top of the garter.
Here is what it looks like after you have sewed on the ribbon
Now it's time to put the elastic back into the garter. This was the most time consuming part for me because I goofed. So I'm warning you now, make sure that when you sew your ribbon on that you leave enough space for your elastic to fit back through. I didn't think of that and wound up having to cut my elastic to make it fit. Also, I used a needle to push it through, but I am sure there is something better to make this step speedier.
After I got the elastic through I made sure to measure the garter on my leg again. Pull the garter tight and then allow about 1/2 ince for stitching. With the added ribbon I actually had to cut some of the material off because it was too bunchy. I then sewed the elastic at the end in place so that way it was more secure.
Finally, I sewed the two ends together. I sewed over this part about 5 times, including back stitch, to ensure it was secure. Once I completed the garter I set it aside and worked on the embellishment.
For the bottle cap embellishment I used these supplies.
I had trouble finding a decent picture to use so I searched Etsy for images. I came across Sonyarita Designs and decided that their images were the perfect size and for $1.75 for unlimited use I couldn't really resist.
I used my hole punch to get a perfect cut out of the image I wanted
Afterwards I placed the plastic cover on top
Then I hot glued it on to the bottle cap
There you have it!! It is perfect...in my opinion...minus the minor errors :)
Normally I do a total costs, but since this is a gift I have decided not to. Let's just say that something like this is selling for around $35 and I made it for well under that in just a few hours! Since it is almost wedding season, maybe you can make something like this for someone special to you!
Hoping Amanda loves it!


