Today I am doing a blog swap with Kara from Nest Candy.

Hop on over to her blog and you'll see just how talented she really is! But that's not all you'll get...you'll also learn how to save some $$ here and there with her Money Saving Mondays {i love this idea}
Without further ado, Here is Kara!
Hi everyone! I am so grateful that Caitlin agreed to do a blog swap with me. I adore her blog and all her great ideas. I am honored to be included among the posts! Let me introduce myself a little...
My name is Kara, and I recently started the blog Nest Candy to share my favorite crafting ideas, money saving tips, and network with other creative minds. So far, I have been really enjoying the friendliness of the blogging community. Please stop by sometime and share your thoughts. I'd love to get to know you!
Today I wanted to share an Easter Tutorial with you. Throughout the month of April, I will be posting Easter treats, decorations, and dinner ideas. This tutorial is the kick-start for a month of fun!
Easter Egg Tree
There are so many adorable Easter egg trees out there right now. While I was shopping my local Dollar Tree, I decided to pick up materials I could use to make my own, unique tree. The materials I used include:
- Hanging Foam Easter Eggs - $1
- Purple Floral Wire - (2) $1 each
- Blocks of Floral Foam - $1
- Floral Moss - $1
- Flower Pot - had on hand
- Ribbon - had on hand
- Paint - had on hand
- Glue Dots (optional) - had on hand
I started off by painting my flower pot in the Folk Art color 2582 Light Blue. I gave it several coats and made sure to get the inside edges a little.
Once the flower pot was completely dry, I stuffed the inside with a mishmash of the floral foam I purchased at the Dollar Tree. It didn't need to be pretty, I just wanted a good solid base for my floral wire to stick into.
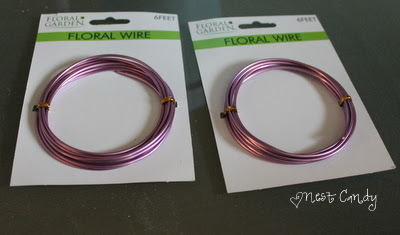
The floral wire comes on a card like this. It doesn't look like a lot, but boy does it stretch out! I bought two packages for this project.
I cut my wire into several pieces and started to randomly stick them into the floral foam. I bent them and lopped them to give it a fun and whimsical look. The beauty of the floral wire is that you can always change it if you don't like it!
Next, I added floral moss on top of the floral foam. Be gentle around your wires so you don't knock them out of place. You really only need enough to cover the surface.

Now the magic happens! This is the part where you get to add the cute little eggs to your design. You may have to do some adjusting and re-bending of your wires to get the eggs to stay where you want them. I tried to keep my colors somewhat symmetrical, but you can arrange them however you want.

The last step is optional. I wanted to add a ribbon to my flower pot. To keep it stabilized I added a glue dot on the back of the pot. This will help keep the ribbon from slipping down.
Bring the ribbon around to the front, tie it, clip the ends, and you're done! Congratulations! You now have a completely adorable, unique Easter egg tree.
I hope you enjoyed this tutorial. Don't forget to check Nest Candy for more Easter treats, decorations, and dinners! Thanks again Caitlin for allowing me to share with your wonderful readers!
http://nestcandy.blogspot.com/

Thank you Kara!


Super cute! I love the purple wire!!!
ReplyDelete